Cakewalk // Documentation // SONAR X2 // Bouncing tracks
Table of Contents Previous Next Index

Mixing ► Bouncing tracks

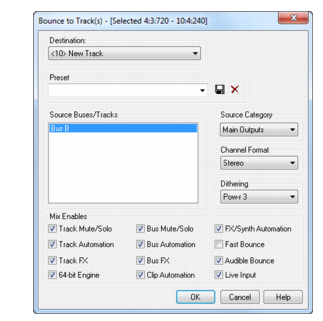
The Track view Tracks > Bounce to Track(s) command lets you combine one or more audio tracks into a submix. A submix can be a mono track, a stereo track or several mono tracks that contain the mixture of the original tracks, preserving the volume, pan, and effects for each track. If you’re bouncing tracks that are routed to a surround bus (SONAR Producer only), you can bounce them to as many mono tracks as you have surround channels, by choosing the Split Mono option in the Channel Format field of the Bounce to Tracks dialog box, and also choosing a surround bus in the Source Category field. After their creation, the submix tracks are just like any other tracks—you can edit them, add effects, copy them to another project, etc. The original, unmixed audio tracks are not deleted, so you can archive them and recover them later, or continue using them as before.
Note: You control the bit depth of all rendering operations (bouncing, freezing, applying effects) in Edit > Preferences > File - Audio Data, in the Render Bit Depth field. The default value of 32 is the best for most situations. See Bit depths for rendering audio for more information.
The Track view Tracks > Bounce to Track(s) command operates completely offline, meaning you can mix down tracks that may be too complex for your machine to actually play in real time.
list-image
Your mix is so complex that real-time playback is impossible. Bounce to Track(s) produces the correct mix, and store the result in a new track or tracks.
list-image
You require more CPU time for your real-time effects. With Bounce to Track(s), you can premix some of your tracks with real-time effects applied, saving CPU time during playback.
3.
If you are using effects on the tracks and want to mix the effects down at this time, select the whole length of the longest track or clip plus an extra measure for the reverb or effects “tail.”
4.
Click the Track view Tracks menu and choose Bounce to Track(s) to open the Bounce to Track(s) dialog box.
Figure 277. The Bounce to Track(s) dialog
6.
If you’ve saved a preset configuration for the Bounce to Tracks(s) dialog box, select it now in the Preset window.
7.
In the Source Category field, select the source you want to use for your bounced track(s) from the following options:
list-image
Tracks. Choosing this option creates new separate tracks for each track you highlight in the Source Buses/Tracks field. Each track you highlight will produce a new mono track, stereo track, or two new mono tracks (the Split Mono option), depending on what you choose in the Channel Format field.
list-image
Buses. Choosing this option creates new separate tracks for each bus you highlight in the Source Buses/Tracks field. Each bus you highlight will produce a new mono track, stereo track, or two to eight new mono tracks (the Split Mono option), depending on whether the bus is a stereo or surround bus, and depending on what you choose in the Channel Format field.
list-image
Main Outputs. Choosing this option creates new separate tracks for each main output you highlight in the Source Buses/Tracks field. Each main output you highlight will produce a new mono track, stereo track, or two to eight new mono tracks (the Split Mono option), depending on whether the output is a stereo output or the Surround Main, and depending on what you choose in the Channel Format field.
list-image
Entire Mix. Choosing this option bounces your entire mix down to a new mono track, stereo track, or two to eight new mono tracks (the Split Mono option), depending on whether the output is a stereo output or the Surround Main, and depending on what you choose in the Channel Format field.
list-image
In the Mix Enables field, choose the elements you want to include in the mixdown. If you want to exclude muted tracks and/or include only soloed tracks, make sure Track Mute/Solo is checked. Make sure Fast Bounce is checked, otherwise the bounce process will take as long as it takes to play your selected track data in real time. Usually, you also want to check 64-bit Mix Engine. This option lets you turn on the 64-bit mix engine temporarily while you bounce your tracks. This produces a higher-quality bounce without taxing your CPU during the rest of your session.
Note 1: If you have patched a synth into a track or bus, make sure you check Track FX to include synths that are patched into tracks, and check Bus FX to include synths that are patched into buses.
Note 2: If you don’t check Track Automation, any initial volume and pan settings in an exported track are ignored and the track’s audio data will be exported at the level that exists in the track, with pan set to center. If you don’t check Clip Automation, any trim settings are ignored during export.
11.
If you want to save your settings as a preset, type a name for them in the Preset box, and then click the floppy disk icon that’s next to the Preset box.
12.

Copyright © 2024 Cakewalk, Inc. All rights reserved
Sitemap | Privacy Policy | Legal